Friday, October 12, 2012

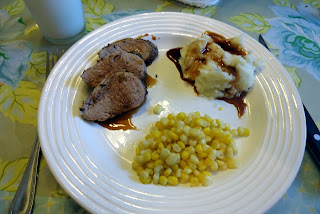
Feed'em Friday - Pork Tenderloin

One of my favorite comfort foods meals are basic meat, potatoes, and veggies.  It's something that I grew up having for our Sunday family dinner and still to this day, I crave my mom's beef roast with mashed potatoes and her amazing gravy.

I have put my own twist on this classic Dutch combination by adding new meat recipes to my bag of tricks.  This pork tenderloin recipe is one of our favorites.  It's super easy and the gravy is to die for.  You'll want to drown everything in it - it's that good.  I found the original recipe on Allrecipes.com but as always I have made some changes. (Please note, if you are using the original recipe, the cooking time is WAY off - it will definitely need to cook longer that it states)

INGREDIENTS:


Pork Tenderloin (pick the size that will feed your family - I typically use a 1.25-1.5 pound cut)
Mustard powder
Dried thyme

Marinade:
1/2 cup sherry
1/2 cup soy sauce
3 cloves garlic, minced
2 TBSP fresh ginger root, minced

Sauce:
1 1/4 cup apple jelly
3 TBSP sherry
1 1/2 TBSP soy sauce

FIRST THE PREP:

First, generously coat the meat with thyme and mustard power.  I don't measure this but I basically just sprinkle it on and eyeball it.  It works best to put the thyme on first since it will stick to the moisture of the meat and then add the mustard. 


Once your meat is coated, place it in a gallon freezer bag and add the ingredients for the marinade.

For those who don't use a lot of ginger root in your cooking, here's a tip.
Purchase a piece of ginger room and cut it up in to large 2-3" pieces.  Freeze these pieces in a freezer bag.  When you need fresh ginger just take out a pieces and set it on the counter for 5-10 minutes.  It will then be thawed enough to easily cut off the outer skin. You can then cut it with a sharp knife into a fine mince.  I find that if I cut it while it's still a bit frozen, it's cuts up nicely without getting mushy.

Also, if you have issues with touching garlic and mincing it by hand, I would suggest getting a garlic press.  My favorite is from Pampered chef.  I have had one for 8 years and I use it ALL the time.  It's the best!


Now the recipe suggests to let marinate overnight but honestly, I never think about dinner that far head. The always entertaining and informative Alton Brown taught me that you never need to let meat marinate for more than an hour.  I have done it for as short as 45 minutes and it still tastes great.  But if you're an over-achiever, place your marinating tenderloin in the fridge overnight.

FINALLY, IT'S TIME TO COOK:

Preheat your oven to 325 degrees.
Place your marinated tenderloin into a oven-safe dish.  I used a medium size casserole dish with a glass lid. 
Roast in the oven until the internal temperature is 145 degrees.  The timing is really going to depend on the size of tenderloin you have.  Mine was just 1 1/4 pounds and I had it in for 40-45 minutes.  Generally I tend to let it cook until there is a little pink in the center.  I then allow the meat to rest before I slice it.


While the meat is roasting, you can make the sauce.  
Put the apple jelly into a small sauce pan and heat on medium heat.  
You will have to babysit this sauce since it tend to boil over quickly but it's totally worth it. 

Once your jelly is hot, add the sherry and soy sauce and simmer on low.  Be sure to stir occasionally and don't over reduce the sauce.  It should get a little thicker but it won't be as thick as a traditional gravy.


I serve this meal with mashed potatoes and sweet corn.  
My kids generally like the meal but my husband and I LOVE IT! 
I douse my meat and potatoes with the sauce and it's heavenly.  


So, from my family to yours, enjoy!


Wednesday, October 10, 2012

"It's Dinner time!!!"

To celebrate the newest addition to the Butterfly Designs product line, I am hosting my very first giveaway.  I truly appreciate the support that everyone has shown me over the years and I hope will be able to do more of these in the future.  Check out the box giveaway box just to the right. There are a couple ways to add your name to the giveaway so please feel free to enter as many times as allowed.  Also, please share this with your friends.  The more participation I get from giveaways, the more often I will do them.

Now on to the introduction of:

"IT'S DINNER TIME" BIB - a bib for those little sitters who are ready for some deliciousness but who haven't mastered table etiquette quite yet.

Though bibs aren't the most exciting thing, as a mom, I know the necessity that they are.  And face it, most of the practical things in our lives aren't that cute.

One of the things I have tried to do with my line of baby items is put a stylish twist on a practical item that babies and mamas need to use.


Bibs are my newest adventure in trying to be creative yet practical.  As simple as it might seems, even creating the pattern for these little guys was a process.  I didn't want something too big so that little guys couldn't use them but they had to be long enough to tuck below the edge of the high chair tray.  They need to be washable but soft on baby's skin, they had to stay on and of course they needed to be cute.

But the number one thing was that they couldn't use Velcro.  There is nothing worse than a chain of twisted bibs, towels and anything else happens to be in the washer/dryer.

My solution was plastic snaps.  These are the snaps that are used on my favorite cloth diapers - Mud Butt Cloth Diapers.
Picture provided by Nicole W.

The snaps stay closed.  I tested it on our foster daughter who is a year and really does not like to wear a bib.  This is the first one she hasn't been able to get off.
 The snaps come in a rainbow of fun colors and they are completely washer and dryer safe.  


Plus I was able to add additional snaps to make it adjustable.

I also wanted to add an absorbent layer without making the bib too bulky.  My solution was a layer of terry cloth.  It's durable, washable and soft enough for around the neck.


As with all my items, everything is top stitched so that there is no twisting of the layers and they will come out of the washer looking good as new.  Ready to get spilled on over and over.   


So, I mustache you a question - what do you think of the newest Butterfly Designs item?
(Cheesy I know but I just couldn't resist.)
What prints would you like to see in the future?

If you are interested in purchasing an item, please checkout the Bibs Photo Album on my Facebook Page and comment on the specific item.  You can also email me or send me a message via Facebook.

Friday, October 5, 2012

Feed'em Fridays - Twice-baked Potato Beef Pie

It's back!!!

This week for Feed'em Fridays, I tried another recipe from the same book as last week.  


This week it's Ground Beef and Twice-baked Potato Pie.  Personally, it's not my favorite name but that what's on the recipe so we'll go with it.  
I did make a couple changes to the original recipe so I am going to post my version.  Feel free to reference the linked website for the original. 

INGREDIENTS:
     1 lb lean (at least 80%) ground beef
     1/4 chopped onion
     1/4 plain bread crumbs
     1 tsp dried sage
     1/2 tsp italian seasoning
     1/2 tsp salt
     1 egg
     3 - 4 medium russet potatoes
     1/4 cup butter
     1/4 cup milk
     1/2 tsp garlic salt
     1 cup shredded Sharp Cheddar Cheese
     4-5 slices of bacon
     1/4 cup chopped fresh tomato (optional)
     2 medium green onions, chopped (optional)

ON TO THE COOKING:

First, cook your bacon. 
There are many ways to do this but this is the method I like to use.   You can even purchase the precooked type and pop it into the microwave. 

Set your oven to preheat to 350 degrees.  
If you used the oven to cook your bacon, it'll be good and hot and will need a little bit of time to cool down.

While your bacon is cooking, you can start the potatoes. 
Just to note, the original recipe calls for a package of refrigerated garlic mashed potatoes rather than making your own mashed potatoes.  This is a great way to make this meal even more convenient but at our house, we LOVE LOVE LOVE real mashed potatoes.

 Peel, cut and boil the potatoes until they are tender all the way through.  
Drain and place in a large bowl.  


Add butter and garlic salt.
Blend with a handheld mixer adding milk as needed and whip until smooth.  
If you use unsalted butter, you may need to add some additional salt.

In a large bowl mix ground beef, onion, bread crumbs, spices, salt, egg and 2 strips of chopped bacon.


Be sure to use a very lean ground beef.  I don't know the percentage of our since it came from a farm but it hard gives off any grease, which is what you need in this recipe.  
Mix together well. 
Hands work best but a spoon or fork works as well.  


When everything is mixed, press into the bottom of a 8-9" round un-greased baking dish.

Next spread the mashed potatoes evenly over the meat mixture.  


Sprinkle evenly with cheese.  


Bake uncovered for about 50 minutes or until the meat is cooked (temperature should read 160 degrees in center).  Top with your choice of toppings and serve.  We stuck with just additional bacon on top but tomatoes and green onions would be a good choice or you really anything that you would put on a loaded baked potato would work.


This meal was a HIT!  Everyone liked it and it was easy to make.  
The one portion we had leftover reheated in the microwave very well.  
It's definitely something I will be making again.  
I hope you enjoy it too!

Sunday, September 30, 2012

Applique Birthday Shirts

This week we are celebrating our foster daughter's first birthday.
This is the first time we have ever had a child who has celebrated a birthday while in our home and since it is her first, we wanted to make it extra special.

For each of my kids, I have always made them a birthday shirt for their birthday party.  Since I have 2 boys they have been fun but I haven't been able to go all out.


But now, I have a little girl to get all dolled up so I went all out for this little one.  The plan started as just a bib, then I thought I'd do a onesie as well but then I just had to do ruffle skirt to bring it all together.

The applique work is fairly simple but I thought I'll give you guys a quick how to for a simple birthday shirt for those who don't have a huge amount of sewing experience.  You can design something as complicated as you're willing to try but if you are a beginner, I would suggest starting simple.

(You'll have to please excuse my terrible photographs for this post.  It was late and my studio wasn't getting great light when I was working on this project)

WHAT YOU'LL NEED:
     sewing machine
     iron and ironing board
     pen or pencil
     scissors (both paper and fabric)
     fabric of your choice and coordinating thread
     Fusible web (I recommend Pellon Wonder Under paper backed fusible web)
     garment to place applique on (t-shirt, onesie, bib)

This shows a few more supplies since I was also working on a ruffle skirt.

First, choose your design.  To start simple, maybe choose a number or letter.  You can sketch out that design or you can use your computer and simply print out a very large font.


Once you have decided on your design, cut it out with paper scissors.

Next take the fabric you will use and cut out a piece that is big enough for your design but small enough to work with.  Also cut a piece of fusible web that is slightly smaller than your piece of fabric.

Lay the webbing on the back side of the fabric.  Be sure to have the paper side up and the rough side down on the fabric.  Fuse webbing to the fabric by running a warm iron over it.  (Please note that all webbing has instructions and for best results, follow the directions that are on your webbing)


Next take your design template and place it face down on the paper side of the webbing and trace with a pen.  Be sure to place the template face down or your design will come out backwards when you flip it over to the right side.  Then carefully cut out your design using a sharp pair of fabric scissors. 


I also decided to add an oval behind to place behind my 1.

Now comes the toughest part.  Getting the paper backing.  Sometimes it's super easy but last night I struggled with it.  It helps to have nails and patience.


Once you get the paper off, place your fabric piece on your garment.
Be sure you like where you want it because once you iron it down, there's no turning back.


When you're happy with the placement, iron it down.  


I always did one layer at a time.  
First the oval and then I could be double sure that I liked the placement of the 1 on top of it.


Now you get to do some sewing.  

There are many ways to tack down your design so that it will hold up to many washings. 
You can use a fancy stitch, a zig zag or if you're not worried about using it more than one time, you can just leave it as it.
I like to use a simple straight stitch about 1/8" from the edge.


I tend to work from the outside in and from the bottom to the top.
So I started a the bottom of my oval and went around and then did the 1.
Take your time and go slow for the best results.  


Tight corners can be tricky but the more you do, the better you will get at negotiating them.


This is usually where I stop in the birthday outfit making but since I just couldn't resist dressing up this little one.  I went on to make my very first ruffle skirt.  It definitely reminded me that I wasn't used to making little garments and I haven't read a pattern in a while but I LOVE the way it turned out.


The pattern was from ViolaLeePatterns and this was her Madalyn Skirt.  The pattern was very easy to follow and it was sent immediately, which is great if you are looking for a pattern last minute.

Though I can't show her face, Little B really did love her new outfit. 


She had a great time celebrating the big #1 in style.  It has been a blessing to see this little girl blossom into an outgoing, happy little goofball with personality to spare.  


And she is officially the best cake smasher we have ever had.


Friday, September 28, 2012

Feed 'em Fridays - Cheesy Chicken Tortilla Lasagna

My favorite part of blogs and Pinterest, is the food.  Recipes, mouth-watering pictures and review of recipes.  Since its a goal of mine to start trying new recipes more regularly, I thought I'd try and make it a regular feature on the blog.  Most of my dishes will be kid friendly but I may throw a few surprises in the mix too.


This week, I put on my apron and tried a new recipe called Cheesy Chicken-Tortilla Lasagna. I found it in one of the many cooking magazines that get delivered but I rarely have a chance to open, let alone cook from.

INGREDIENTS:
     1 can of enchilada sauce
         (I used a mild in hopes of feeding this to my kids)
     2 cups of chopped plum (Roma) tomatoes
         (I used whatever looked best at the store that day)
     2 cups of cubed cooked chicken
     8 medium green onions, finely chopped
     1 can of black beans, drained and rinsed
     1 cup of Southwest ranch veggie dip*
     8 corn tortillas (6") cut in half
     1 1/2 cups of shredded Mexican cheese
         (I used a full 2 cups)
     1/4 cup sliced olives
     2 TBSP of chopped fresh cilantro (I omitted)

* this can be substituted with 1 cup sour cream mixed with 1 TBSP of taco seasoning but I used the real thing since I didn't see the note until I was home with all the groceries.

ON TO THE COOKING:

First, preheat the oven to 375 degrees.  
Spray a 13x9 inch glass baking dish with cooking spray 
and spread about 2 TBSP of enchilada sauce in the bottom.


In a medium bowl, mix tomatoes, 
chicken, onions, and black beans.


In another bowl, mix the enchilada sauce and veggie dip.
Blend well.


Take half of the tortillas and cover the bottom 
of your pan. This was my arrangement.


Spoon half the chicken mix on the tortillas, 
then add 1/2 cup cheese
and top with about half the sauce mixture.
Then repeat - add a layer of tortillas, 
chicken mix, cheese and sauce.


Cover with foil and pop in the oven for about 
40-50 minutes or until bubbly.
Then remove foil, add remaining cheese and olives 
and return to the oven.
Bake for an additional 5-10 minutes 
or until everything is melty and delicious looking.


Then here comes the hard part.  
Let sit and set for a few minutes.
I did not do this which is why you don't have a nice, on the plate, ready to eat shot.
Mine came out looking like a mess but it was delicious.

The kids weren't so excited about this meal but really, with the moods they were in, I could have served their favorite foods and they would have complained.  But it's okay - it was more for me and the hubbs.  All we have is two good size pieces leftover for tomorrow so I'd say that we enjoyed it.   

So that's one of the ways I attempted to feed'm this week.  I hope you enjoyed it and if you try the recipe, let me know what you thought.

PS - the leftovers reheated very nicely and it was great the second time around too.

Wednesday, September 26, 2012

Inspiring inspiration

There are times in my life when life drags me down.

Exhaustion sets in, household chores pile up, daily duties overwhelm me and the joy and inspiration gets sucked out of me.


Can you relate?

I think that a lot of my problem is that far too often I allow unrealistic standards run my life.  When I worked outside the home, I dreamed of the day I could stay home and have a perfectly clean house, with laundry folded and put away and serve delicious home-cooked gourmet dinners every night.

Then I became a stay at home mom to 2 kids and reality struck.

Yes, as a stay at home mom, you are home more but that just means you have more hours of living in the home, which equals more mess.  Laundry is lucky be clean and it's a miracle for it to actually be folded and put away.  And home-cooked meals resemble "kids food" and closest I get to gourmet meals is in a recipe book (on a dusty shelf).

Sometimes I look around and all I see is disappointment, and failure.


Real life is not always fun and far too often I let it suck the inspiration and joy right out of me.  The meloncholy, uninspired feeling can last a day or a week.  It usually lasts until I do something to kick myself out of that joyless funk and do something to inspire inspiration.

So tonight, after a couple days of feeling uninspired, I'm taking some steps to bring inspiration into my life.
Everyone has their own tricks but here's mine.

I do the most uninspiring thing I can think of.

I know that sounds insane but completing the most uninspiring task brings great satisfaction.  So tonight, I ill be folding laundry.  It's one of my least favorite tasks and I put it off all the time.  Nearly every morning, I go down to the laundry room and dig through this mess to find some clothes for me and my kids.


I can't believe I'm even sharing this photo but it's the reality of my situation.  And for as much as I hate folding laundry, I love the feeling of satisfaction of having everything folded and put away.  It may only last a hour but for that hour, all the clothes will be clean, folded and put away.

And typically while completing such a mindless, menial task my mind is allowed to unwind, relax and amazingly, find inspiration.

So tonight, no sewing for me.

Tonight I will be mindlessly folding clothes of all sizes and colors and injecting some inspiration back into my life.

So, how about you?  How do you move past feeling overwhelmed and uninspired and begin to feel inspired again?


Sunday, September 23, 2012

How it all started

I have often been asked how I got started.

Its a bit of a long story so please, bear wih me.

Butterfly Designs has been quite a journey that started when I was very young.  As I mentioned in my intro post, I have always been around fabric and sewing.  I am first generation Canadian, which means that my parents immigrated.  Well, technically my dad immigrated when he was very young and my mom is first generation.  but the point is my family is very Dutch and we grew up with a deep heritage but not deep pockets.  Looking back, this was a blessing.  I wasn't handed everything but I earned it or I was taught to DIY before the term was even coined.  Creating was just part of our culture.

I don't remember a time when I didn't know how to sew - I played beside my mom with the whir of the sewing machine as background music.  I don't know how far back it started in our family tree but my paternal grandmother taught my mom and she also taught me.  When I was in middle school, I had to take home economics class. I finished the semester's project in the first day. I was promptly assigned to make a dress and assist in teaching the rest of the class.  In high school, I couldn't find a formal dress that I liked and fit so my mom and I designed one and made it.  It was just what we did and it's never been a big deal.

When I moved away from home, my mom gifted me with a sewing machine. It was the same one that she had so it was like an old friend.  I was sewing infrequently for a number of years but it wasn't until I was married and getting settled in life did I really start feeling that urge to create again.

The idea to start making aprons came to me after attempting to find a cute apron about 7-8 years ago and finding nothing.  I decided to make one and the "Andi Apron" was born.  I made one for my mom and my grandmother, and for some gifts.  The Madison Apron came into my head after seeing someone wearing a sundress with pants - which is a little weird but apparently inspiring. I put my patterning skills to the test and I designed the Madison apron and the I began to sell on Etsy.

Things were very slow at first.  I was enjoying my career at the time, we had our first son and then things got really interesting.  I would open my shop for 6 months and then have to shut it again for one reason or another.

But then Baby #2 came around.  I had decided I wanted to stay home and raise my boys so I quit my job, which had always been a great balance of right brain creative work and left brain business analysis to keep me complete stimulated mentally.   It took about 2 weeks of staying home to realized this wasn't going to work and I was going to need something additional to focus on.  That's when I got serious about Butterfly Designs.  I started building an inventory and adding new items.    In the fall of 2009,  I did my first tiny craft fair and I was hooked.  It wasn't a success but the energy I got from doing it made me realize this is what I wanted to do.  I resumed selling on Etsy and then realized that Facebook is a much more personal way to reach my customers.

It's been just over three years since I made that leap and I am loving it.  It's been a challenge to balance work and kids and life in general but I think as moms, we all deal with that on some level.  No matter if you are a working mom, a stay at home mom or a work from home mom, it's a challenge not to loose ourselves in the chaos of every day life.  It's hard not to push back those dreams and just "power through" life.  It's exciting to have finally realized that the whispers in our hearts, those things that truly make us feel alive, are important.  And not only are they important but they are essential for us as women and moms to listen to.  If we continue to suppress those things that make us feel alive in our core, we start to allow depression, fear and self-doubt creep in.  Whether your heart skips a beat over the thought of painting a picture, going for a run, dancing or cooking a gourmet meal, these things are key to living your own full, happy and healthy life.

So, do me a favor this week.  Try to take a moment to do something for yourself, in a completely unselfish but self-renewing way.  Let me know what you did - I'd love to hear about it.  I'll do the same and let you guys know.